
How to install ShadowSocksR(SSR) server in CentOS 7 – Complete Tutorial(2019)
First, we will give a brief introduction to ShadowSocksR(SSR). ShadowSocks is a Socks5 proxy-based encryption transport protocol, which is characterized by protocol obfuscation and not easy to detect. ShadowSocksR is a third-party version, adding some functions and plugins.

We can use ShadowSocksR to hide our real IP or to simulate the IP address of a specific country. Although there are many merchants that sell SSR servers directly, it is obviously best to build SSR proxy servers ourselves. The following is a complete tutorial on how to install SSR in CentOS 7. Each step has detailed instructions.
Buy a VPS
The first step, we need a server – VPS, to install SSR server software, preferably famous manufacturers. We highly recommend Vultr, which has many years of operating history and has a good reputation. Vultr supports server selection in multiple locations around the world, supports a variety of configuration options. The cost is based on configuration and time duration, Vultr supports hourly billing, can be canceled at any time, very convenient.
Sign Up URL: https://www.vultr.com
After creating and activating the account(email verified), then on the Billing page, you can start recharging. After the recharge is completed, you can use the balance to purchase the server.

Currently, Vultr supports a variety of recharge methods, as shown in the above figure, including Paypal, Bitcoin, Alipay, Wechat Pay, etc. If you choose Paypal, click “Pay with Paypal” to log in to your Paypal account to complete the payment.
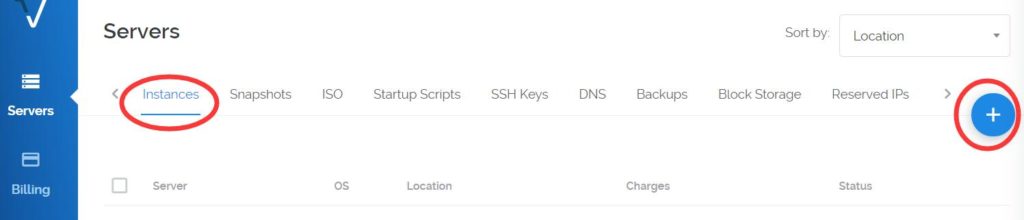
After the recharge is completed, you can purchase the server, within “Servers” page, click “+” on the Instances TAB to select the server. You can choose the geographical location of the server, the type of the server, the storage size of the server, and some additional options.
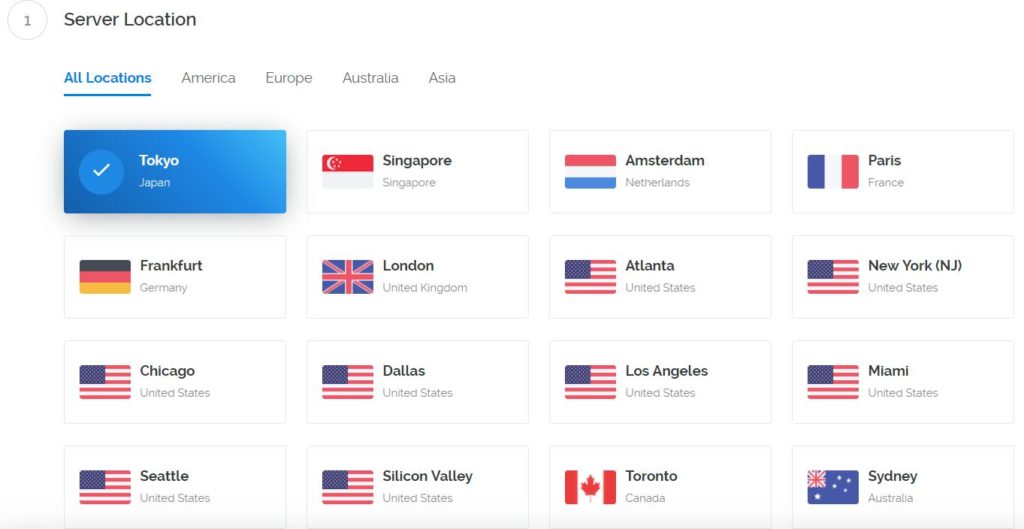
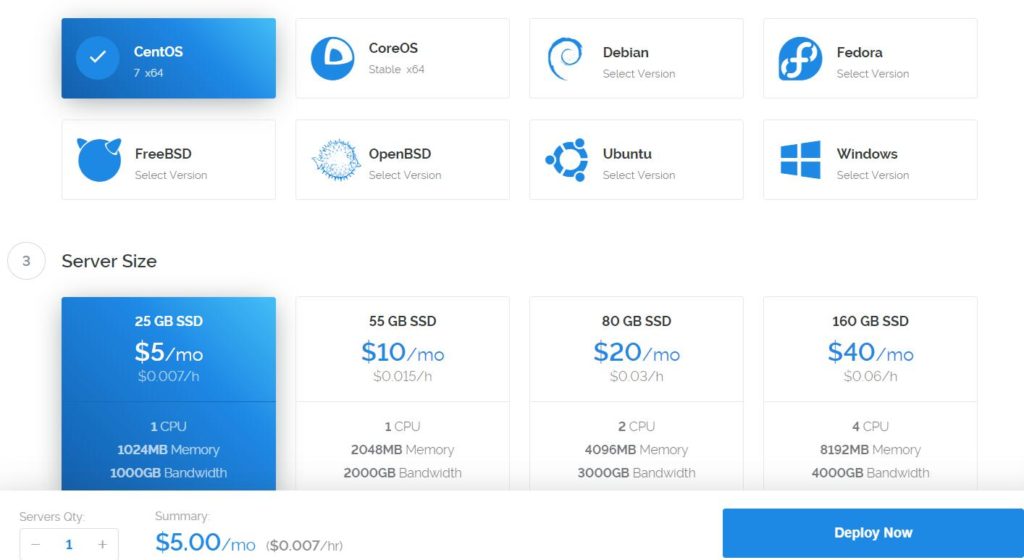
Here we choose the server in Tokyo/64-bit CentOS 7/25GB SSD/1 CPU 1024MB Memory, 5 dollars per month.
The actual cost is charged according to the hour used, so it is 0.007 US dollars per hour, and it can be suspended when not in use, which is very convenient. Once you have made your selection, click on “Deploy Now” and the system will automatically deploy the server for you.
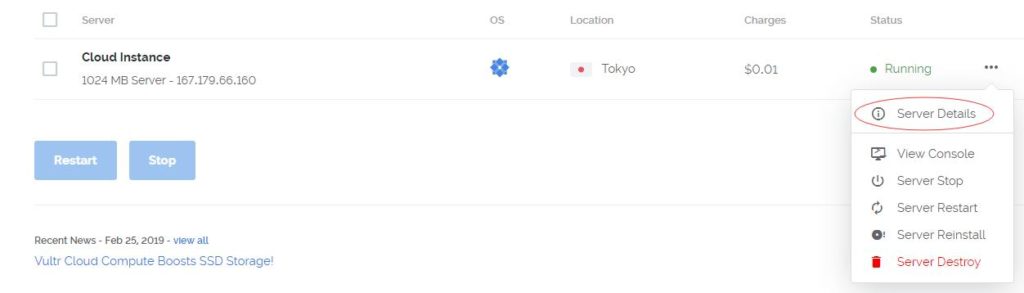
After the deployment is complete, click “Server Details” to view the detailed information of the server and obtain the password of the root user.
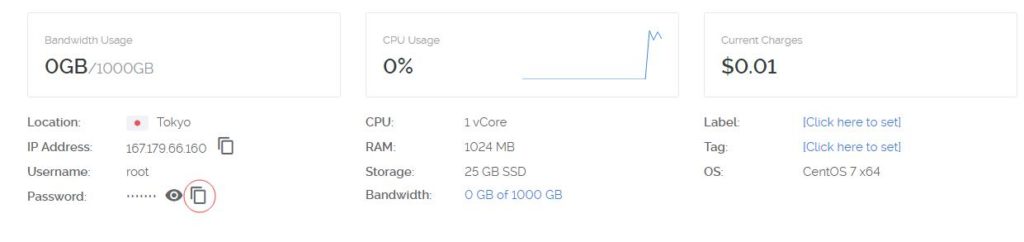
Click the icon next to “Password” to directly copy the password of the root user. Now, you can use the SSH login tool to connect to the server. You can use SecureCRT or the built-in connection tool. After successfully logging in to the shell, you can start installing the SSR.
Install SSR Server Software
The second step is to install the SSR server software. There are many ways to install it step by step, but we use a simple and convenient solution, a one-click installation script which can be obtained from GitHub.
input: wget -N –no-check-certificate https://raw.githubusercontent.com/ToyoDAdoubi/doubi/master/ssr.sh && chmod +x ssr.sh && bash ssr.sh
There will be a lot of wizard settings here, you can choose port, account, password, encryption, protocol plugin, confusion plugin, etc. For example, we choose port 2333, aes-256-cfb, origin,plain, and default password.
In addition, you can use the following command to start and stop the SSR.
Start ShadowsocksR: /etc/init.d/ssr start
Stop ShadowsocksR: /etc/init.d/ssr stop
Restart ShadowsockR: /etc/init.d/ssr restart
Check the status of ShadowsockR: /etc/init.d/ssr status
At this point, we have installed the ShadowsocksR server software on the VPS, the next step is to install the client.
Install SSR Client Software
The third step is to install the ShadowsocksR client. You can go to https://github.com/shadowsocksr-backup to find the latest version of each platform.
You can find the Windows version at https://github.com/shadowsocksr-backup/shadowsocksr-csharp, follow the instructions above to install it.
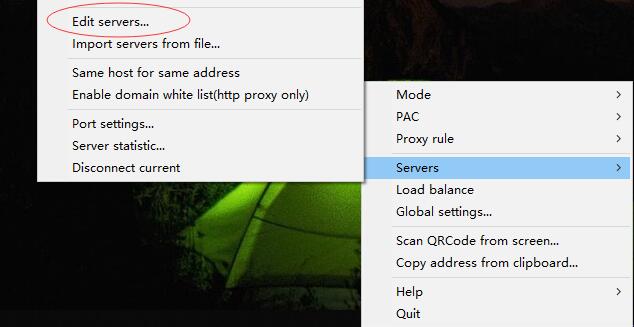
After the installation, you can find the SSR icon in the lower right corner of the desktop, right click and select Servers -> Edit servers.

Fill in the server information above and click “OK”.
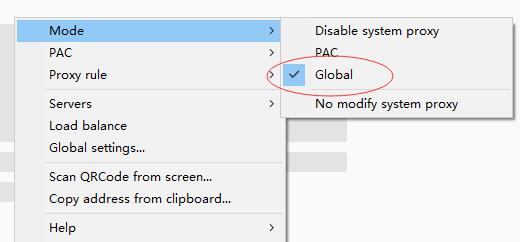
Set Mode to Global, that is, enable global mode, now you can successfully connect to the SSR server.
This article details the installation, setup, and client setup methods of ShadowsocksR (SSR) on the CentOS7 platform.
For more useful content, please pay attention to other exciting content of the MakeMoneyFastGuide.